Saturday, July 6, 2013

Hi Ho, Hi Ho, Back to Work I Go!

by Lindsay

Once upon a time there was a mother who loved being at home with her three children. This mother knew that her time at home was temporary and that maternity leave would come to an end however she did not know how hard it would be. Yes, that's right. The third time returning to work after maternity leave would be the hardest. So, almost a month ago, that mother turned in her comfy clothes and ponytail for her dress pants and cardigan and went back to work.

The rest is a haze. Seriously, by the end of the day I am exhausted, the house is still a mess and I'm too tired to even catch up with friends by reading their facebook posts let alone actually see anyone face to face. But this story has a silver lining.

I requested to work part time which is almost unheard of in my mostly male profession. Approvals had to go up three levels of management, all men. I still can't believe they said yes! I am now officially working a 0.7 which means I will work three days one week and four days the next. I really think I am so lucky.

While I was off, I'd made some huge changes to my family's diet and one of my fears about returning to work was that I would fall back into some old habits. Mainly, that I would buy more pre-packaged, processed, and take out foods. I try to practice moderation on those types of foods for a few reasons. One is that I believe a whole food diet is the best choice for me and second is that it costs a lot more than making things from scratch. So I've decided the only way to succeed is to be prepared.


One day while making some pancakes, I decided to pre-mix a few extra bags with the dry ingredients. I also threw together a few bags for hamburger buns / dinner rolls (minus the yeast). I'm not going to suggest making bread is fast now, but if you've ever eaten a fresh bun out of the oven I'm sure you understand why I do it.

Getting back into the work routine is hard. The best tip I've gotten so far is to dress your kids for the next day after bath time, instead of putting them in pajamas. My first thought was "What?", and then it clued in. My kids wear comfy cotton shorts and t-shirts every day and there pajamas don't get dirty anyway. Genius, right? Thank you cousin Theresa.

Do you have any tips on being more efficient with cooking, cleaning, etc.?  Please share.


Friday, June 7, 2013

Handmixed Home and Body Products


by Lindsay:

Have you ever noticed that a lot of the cleaning and body product companies claiming to be more "natural" use people names in their brand name? I guess the marketing groups at Tom's of Maine and Jason Naturals decided that the consumer would imagine an actual person intimately involved in mixing these products. Well, I'm about to get a whole lot more intimate with my own products because I'm going to mix them all myself. 

All of my children struggle with skin reactions, rashes and irritations. Nothing as extreme or painful as the Google images I find while self-diagnosing our conditions but enough to make me stop and think "What is irritating their skin and how can I help them"? Recently, my 1 year old baby Emmett, who we thought was going to escape my "bad skin" gene broke out in head to toe eczema. I am using medication to get it under control but this flare up has also renewed my interest in natural ingredient home and body products.

I have already switched to using vinegar for most of my cleaning work but I still have too many chemicals in the house like laundry and dishwasher detergents and stain removers. I would also like to replace all body products with fragrance free easy to read ingredient versions. I am seeing a whole lot more of these options on store shelves which is awesome but I have a really hard time paying $6 for toothpaste when the main ingredient is baking soda. 


After doing a quick search I decided to buy the following ingredients:
- Castile Soap ($17.99/944ml) Ouch!
- Rubbing alcohol ($2.49/500ml)
- Washing Soda ($5.97/3kg)
- White Vinegar (I already had this but I guess $5.00/4L)
- Baking Soda ($3.28/2kg)
- Vegetable Glycerine Bars ($1.99 each)
- Peppermint Oil ($2.09/3.7ml)
- Tea Tree Oil (I already had this but I guess $10/10ml bottle)

Total $48.81 (will make lots and lots of stuff)

Hopefully these items will get me well on my way. Just so I don't get too overwhelmed, I'm going to replace things as they run out and share the recipes as I go along. I would really love any recipes or suggestions that you have. Maybe you have a tip for getting food stains of kid's clothes or maybe you just want to warn me that making your own deodorant just isn't worth it. Either way, I'd love to hear from you!

Sunday, June 2, 2013

Emmett's Handmade Sensory Book

by: Lindsay

I've challenged myself to make or buy handmade gifts this year. Recently, my baby Emmett turned one and I made him his very own sensory book. Here it is.
Emmett's Sensory Book
I have to admit Wyatt and Emmett already had one. Their older sister Hailey made them a very special book last Christmas. It is pretty awesome. She embroidered their names on it and made different pages for counting and shapes. She even made a mailbox page and included a handful of postcards inside. It does belong to both boys however Wyatt has kind of laid claim to it and keeps it in his room. That is why I though their was a place for a second book just for Emmett.

Hailey's Sensory Book
I used Hailey's book as inspiration (can you believe she was only twelve when she made this book?) and got many great ideas on Pinterest from here and here and here.

What did you do with your old sentimental baby clothes? Did you pass them on to a new baby, use them for crafting or make cleaning rags? I did all three but my favourites ended up in this book.

Saturday, May 25, 2013

A Blanket for my Sister

Post by: Lindsay

I'm not a quilter, I'm a blanket maker. Yes, there is a difference. A quilter has the patience to sew scraps of fabrics together into detailed designs. Blanket makers prefer large blocks and quick results. This is the blanket I made for my sister Lenore's birthday in keeping with my 2013 handmade gift challenge.

Lenore's Blanket
When Lenore and her husband Jack were married almost two years ago she DIY'd all of the decorations. The tables had different fabrics that looked good together but were different enough not to be too matchy-matchy.

Lucky for me, Lenore was willing to give me her wedding fabric and turn it into a useful blanket filled with memories from her special day. I cut the fabric down into 4 1/2" by 11" rectangles and then pieced them together in a subway pattern. The final blanket is 42" by 60", hopefully a good lap size.

A present for Auntie Lenore

I had to sneak my tulips into this picture. They are my flower garden superstars right now. Happy (belated) birthday Lenore, hope you like your blanket.

P.S. I have three children but somehow Wyatt is the only one around at picture time. I'll try to mix it up next time.

Sunday, May 19, 2013

Snakes Snakes Everywhere

Our winters are long and summers are short here in good ol' Manitoba. Last year Lindsay and I decided that because of the short summers, and no holiday time for myself, we wanted to jam pack our weekends with as much fun as we could handle. This coming summer will be no exception and I thought I would share our first summer excursion.

We spent the day at narcisse snake pits. This Manitoba wonder contains North Americas largest congregation of snakes in one place. Our climate doesn't fair well for reptiles to thrive all year long. The red-sided garter snake has adapted to the cold winters in an underground tunnel paradise formed in the limestone rich area. Snakes travel from all around in the fall and find solace and warmth underground. Then when the spring air warms they emerge and spend about a week um ah well.. lets just say assuring their existence. Even if you are not a big snake fan, we would recommend, at least once, experiencing this phenomenon.


Hailey was the only on brave enough to catch and hold one of the snakes.

Wyatt was amazed with all the snakes slithering around.

View of one of four pits.This pit was by far the most active.

Mating Ball of Red-Sided Garter Snakes.
End of the trail. Lots of fun had by all.

 What kind of fun things have do you do over the summer months? Anything big planned this summer?

Jason


Sunday, May 12, 2013

Garden Update: Seedlings and Soaker Hose

Happy Mother's day to all the mommas out there. Hope you were spoiled rotten today!

It's been a really long winter here in Manitoba. The weather has finally come around and I was able to get outside for some long overdue gardening. Jay and I put these raised cedar beds in 3 summers ago in the only sunny part of our yard. I like raised bed gardening because:

1. I like clean lines and contained dirt.
2. I don't have to bend over as far to take care of the plants.
3. I have minimal weeds so far. I know this can get worse over the years.
4. I can plant things really close together because I don't need walkways.

Garden Beds with New Soaker Hose
This year I decided to add a soaker hose. Our summers can get pretty hot and dry here and it just makes sense to water more efficiently. I'm also pretty lazy so this can be a huge time saver. Those little white specks in the dirt are actually egg shells. I guess they weren't fully composted when I added it to the garden last Fall.

Basil and Sweet Peppers


The first round of basil and sweet peppers I planted didn't germinate. I had them in peat pots and I think they dried out (I'm a lazy waterer, see reason I got a soaker hose above). This second round was started in plastic pots (I reuse them) and they are all doing great.


Tomatoes
These tomato plants are taking off. I have 3 different varieties of shorter season plants, Carbon and Anna Russian (both heirlooms) and a hybrid cherry tumbler.

I ordered all my new seeds this year from Heritage Harvest Seed. They are a Manitoba mail order business specializing in heirloom vegetables, flowers and herbs. I chose them so that I have the option to save my own seeds to replant next year.

What are you growing this year? Do you have a preference for heirloom, organic or non-GMO seeds? Do you think it's important for kids to know where their food comes from?

Lindsay


Monday, May 6, 2013

Chest Freezer Organization


I recently signed up for a meat subscription service with the local family business Harborside Farms. Over the next year we will receive half a cow (quarterly installments), half a pig (quarterly as well), a dozen chickens and one turkey (fall delivery), 4 dozen eggs per month as well as a number of farm goodies like bacon, sausage, honey and maple syrup. Yum!

Freezer Before
Did I mention I have a small chest freezer? Jay's grandma gave us this freezer when she moved out of her house and it's been really great. It never bothered me before that it didn't have any wire baskets or dividers. Now that I've ordered all this meat I started wondering how I would store it in here. I imagined dinners would be sort of like picking names out of a hat except that I would be picking brown paper packages out of the freezer. "Tonight we are having...drumroll...pork chops!"

So I did what I always do in situations like this, I went to Google and Pinterest for inspiration. I found lots of great ideas for upright freezers but all the chest freezers seemed to be organized by putting food into boxes or milk crates and stacking them in there. I actually bought two different types of containers and brought them home to try but didn't like either of them. There was so much wasted space and I didn't like the idea of pulling out a bunch of containers to get at the stuff on the bottom. I'm pretty lazy by the way.

Then I had my Aha! moment. I decided to make dividers out of leftover 3/4" plywood. First I asked my husband to cut the pieces on the table saw. The pieces were:
1 piece - 18" x 26"
2 pieces - 18" by 9"
3 pieces - 18" by 7"

Adding Dividers
I had originally planned to screw the boards together but the pieces were so snug Jay had to hammer them in place. Now I can quickly remove a board or move it over to make room for larger items or make bigger spaces.

Finally, I made some labels and stapled them on to the edge of the plywood so that whoever is in there can quickly find what they are looking for.

Freezer After
The best part of this project is that it was FREE! You can see the pink 50% off sticker on my loaf of bread so you know I love a good deal. I also think this makes the best use of space. If you're wondering why I didn't make the compartments even deeper (they are 18" right now), it's because I thought it would be difficult to reach in and get things at the bottom and I also want to find some of those wire baskets that slide along the top edge of the freezer.


I'm really happy with how this turned out but the real test will be when the meat delivery starts next month. Hopefully I will have enough room for everything. If not, do you want to come over for a Barbeque?

Monday, April 29, 2013

Old MacDonald had a Farm Puppets


As part of this year's handmade gift challenge, I made these Old MacDonald Puppets for Wyatt's third birthday. I got the idea and templates from this awesome craft blog Just Another Day in Paradise.
The puppets were seriously cute already so I didn't change much other than adding overalls and a straw hat on Old MacDonald himself.


I also added a zippered bag made out of some John Deere fabric to keep them all together. I'm really happy with how they turned out. I had so much felt I ended up making two matching sets. This way I'll have a gift ready to go on short notice. Next birthday is my baby Emmett, he's turning one at the end of May. I was thinking of making him a puppet set too since Wyatt doesn't share this one very well. Maybe safari animals, or a Canada set with a beaver, moose, polar bear, etc. What do you think? Any different animal group suggestions?

Saturday, April 20, 2013

The Best of Bath Worlds: Before and After

I haven't always hated my bathroom. When we moved in 6 years ago the whole house was in pretty bad shape. It had been a rental and it was obvious that the landlord had put the bare minimum into this place.

 
Before


So, even though there was a lot of work to do we decided that we loved the area, and for a first house it was affordable which meant we would have some spare change in the budget to change things here and there. Six years later the house was complete: new roof, kitchen, furnace and air conditioner, windows and doors, soil grading and garden, light fixtures and outlets, shed, finished basement with additional half bath, hot water tank, flooring throughout.

When we first moved in, the bathroom was so far off the reno-radar it didn't even register. It had a white tub, toilet and sink so it seemed fine. It even had this cool black and white floor. Well, it didn't take long after moving in to realize that cool floor was made up of square foot stick on vinyl that were no longer sticking and mold was forming underneath them. The ceramic tiles in the shower looked fine but water had made it's way behind them and softened the wall. When you pushed on sections of the wall it would move.

Midpoint


Jason, his dad and cousin Travis got together to do a budget renovation that would get rid of the structural and health issues. They replaced the floor with a single cut to fit piece of vinyl, ripped down the tile, made wall repairs (the insulation was wet but luckily the framing members were ok), put up a cheap tub surround and freshened it up with a new paint job. I knew this was never the long term solution but it looked great and felt solid.

At least it was good for a few years. Then we started noticing the caulking around the tub would never hold and got moldy really quickly, plus the finish on the tub was so worn that dirt stuck to it and the darn thing never looked clean.

So a few months ago we decided it was time for the major overhaul we'd always wanted. The bathroom was completely gutted and built back from the studs. While we definitely kept things affordable (bathrooms can get crazy expensive), we didn't cut any corners on the foundation. A new level and solid subfloor and hardibacker/waterproof membrane behind the tiles means this bathroom will last many many years.

I love how this space turned out from the subway tile,to the wrought iron towel hooks to the the vinyl tile hardwood "look" floor.  I would have preferred a vanity sink with storage but I didn't think it would work in this space so instead we built an over the toilet shelf based on this design by Ana White.

The best part is how easy it is to clean the tub. Have you ever tackled a bathroom?

Sunday, April 14, 2013

Starting Seeds to get my Garden Fix

The view out my kitchen window is unusually white for mid April. A foot or more of snow still covers my raised garden beds. The tops of the compost bins are peaking out, the black plastic trying to melt the snow around them but nowhere near efficient enough to cook compost right now. I imagine it to be one solid block of the winters veggie scraps sitting on top of autumn's leaves. I can't help but check daily, noting how the sun is now high enough for full sun in my beds. My house is a two story on a postage stamp of a lot. In the fall, the angle of the sun turns my whole backyard into "where the sun don't shine", literally. I've toyed with the idea of cold frames only to realize after hours of planning that no cold frame will work if the sun doesn't shine on it. So while I wait for the slow melt, I'm turning to indoor seed starting to get my fix.

First I needed to make sure my handsome assistant was available. His brother Emmett had just gone down for the AM nap so I knew we had a good hour.


I ordered all my seeds in January from Heritage Harvest Seeds, a Manitoba business that only sells open polinated and heirloom varieties. I like that these seeds came from my area and that I could save them for next year if I wanted. I couldn't wait to start gardening so I had already planted some red onions (Tropeana Lunga) back in February.  I then decided to add a heat mat to my collection. I failed at starting my melons last year and had heard that lack of heat could have been the problem. I really really want melons and Jason asked for peppers so I made leap and bought a heat map. Other than the florescent light set up, the heat lamp was the most expensive part of my indoor equipment. It was about $30.

 Wyatt and I had another garden morning April 6th and planted basil, lettuce, 3 different tomatoes, sweet peppers, spinach, beets and swiss chard. We used the peat pellets that came with the heat mat kit to plant 2-3 seeds per pellet and put them on the heat to germinate. The difference was awesome, seeds were popping up in 3 days. Unfortunately I made some beginner mistakes. I should have taken out the plants that had germinated and moved them under the lights. Instead, I just popped open the lid and waited for the rest of the seeds. After a week, the tomatoes were already leggy and the chard and beets were hitting the lid. I also think it was too hot for the spinach and lettuce. Only a few plants had bothered to germinate. I know it is still early and hopefully in their new non-heated home, the rest will pop up soon.


We transplanted the tomatoes, burying the stem deep so that new roots will grow and hopefully making them hardier. Only 1 of the 3 peppers had sprouted so it stayed on the heat mat for now along with the basil (I read that both will benefit from a little longer with the extra temperature).


So under the basement lights they go. Now if only the weather would start co-operating. My official last frost date is the end of May. I was hoping to put out cold weather plants (onions, lettuce, chard, beets) at the end of April. We'll see.

Do you like to garden? Have you ever considered growing backyard vegetables?

Saturday, March 30, 2013

Handmade Owl Purse Tutorial

I mentioned in my last post on New Years Resolutions that I was challenging myself to create handmade gifts this year. Easter weekend was crazy in my house because my daughter Hailey and first son Wyatt were born exactly 10 years and 3 days apart and this year their birthdays landed on Easter weekend. It's a good thing I started making their gifts early. Wyatt got a super cute Old MacDonald puppet set and For Hailey I made a zippered and lined Owl purse. Today I'm going to share how I made the purse.

I started looking for gift ideas by googling handmade, teen, DIY, sewing in all different combinations. I landed on a few Owl purses that I thought looked really fun and decided to give it a go. I decided to make two bags at the same time. Since I'm going to try to give handmade gifts all year this gives me an extra present ready to go.

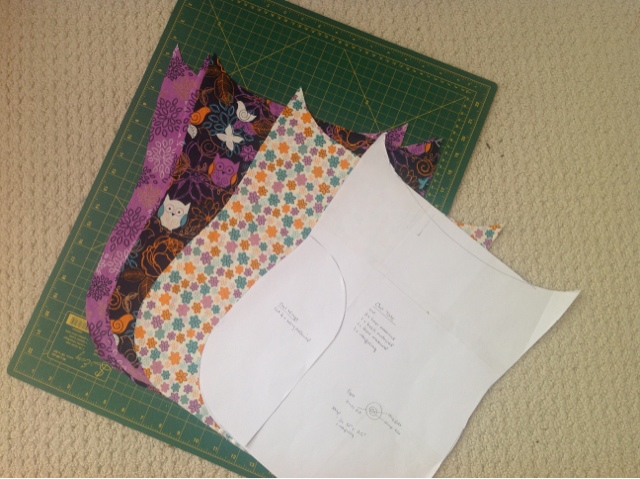
1. I made my own pattern from printer paper taped together. I know you can buy a pattern from one of these sites and if you want to do that I think the prices are pretty reasonable and it takes the guesswork out of sizing and scaling the features, etc. I've made a few bags before so I felt pretty confident I knew what I wanted. I found a cute owl fabric package at Walmart for about $12 with five different but matching patterns. Not the most affordable fabric I've ever purchased but I liked it enough to splurge.

2. With my rotary cutter (just use scissors if you don't have one), I cut out
- 5 layers of the owl body pattern. One for the front, one for the back, two for the lining and one out of a lightweight fusible interfacing.
- Two wings
- Two large circles for eyes, I used pickle jar lids to trace the circle onto the fabric then cut them out with scissors.
- Two medium size circles (I just used a baby food jar lid) and a triangle nose out of orange felt material.
- Two small circles (just eyeball it, pun intended) out of black felt for the pupils.
- Six long strips approximately 2.5 inches by 30 inches for the straps (two out of fabric, two out of a different fabric and two out of interfacing)
- I also bought some thread and a zipper at least an inch longer than the width of the bag. I think mine was 14 inches.

3. To make the front of the bag, the owl face, I first ironed the interfacing onto the wrong side of the front fabric. The interfacing stops the material from stretching and gives it a little bit of stiffness. Then, I just layered on the eyes, nose and wings using a zig zag stitch over the edge of the fabric and a small stitch length. I used a straight stitch on the felt (felt doesn't fray so the edges don't need to be covered by a zig zag).

4. To make the strap, I ironed the interfacing on to the wrong side of the fabric (two pieces) and then sewed the short ends together to make a super long piece. I would have just used a continuous long piece of fabric if I had it but the material I bought were smaller squares. I also sewed the two lining pieces together to make another long strip. Sew the two long pieces with right sides together down their long edges. Trim with zig zag scissors and flip the strap right side out. Iron.

5. With right sides together, sew the owl face to the back, and the inside lining pieces together. Flip the outside bag around and press flat but leave the lining as is.

6. Then I sew on the zipper. I follow the instructions on this blog (http://dilleydally.blogspot.ca/2009/03/wetbag-tutorial.html) because they work really well. The only variation is to make sure your strap is first positioned where you want it. I also had to trim the "ears" of the top of the fabric to make a straight top edge when I couldn't figure out how to put the zipper on the curve. Maybe one day I'll figure it out.

I think it turned out really well. I was afraid it would be to juvenile for a girl turning 13 but Hailey says she likes it. I filled it with candy and an iTunes card so that probably helped.

Lindsay


Tuesday, March 26, 2013

New Years Resolutions

Way back in January (that seems so long ago now), I made a few New Year's resolutions to motivate myself into doing a few of those things I'd been meaning to do for a while but never seemed to start. They were:

1. ORGANIZE: Clean and de-clutter the house. I always clean in spurts. Life can be moving along at a pretty steady pace and everything seems normal. Then, all of a sudden, I announce that the state of my kitchen floor is absolutely disgusting and I can no longer live in this pig pen. When I really start to think about it, this meltdown has a lot more to do with my anxiety level than the mess. But for me, the two are so connected that I need to be aware I feel better with some small amount of organization to the toys that have now taken over 5 of the 11 shelves on my living room bookcases. Less mess = less stress.

2. HEALTH: Take control of my health beginning with the foods I feed my family every day. This is a huge one so I'm making small changes at a time. A this time, 3 months later, I'm extremely proud that I've cut out 95 percent of processed foods. Don't get me wrong, I love convenience food and I've let the occasional baloney sandwich pass my lips but its a whole lot better than before. If there was a line of freezer meals that fit my food goals I'd be in.

3. HANDMADE: This last one was kind of a last minute add-on. I've long been bothered with the excess stuff that fills my house (see resolution #1). I decided this year to give handmade gifts that hopefully show people how much I love them and that I put special thought into each gift. This probably wont make me very popular when my 12 year old has a tween party to go to. I may break the rules a little at times. Here are a couple photos of my completed gifts so far. I hope to share more of the details soon.

Lindsay


Thursday, March 21, 2013

Problems of a Two Year Old

I'm not sure where to start with this whole blogging thing so let's just talk about what is going on at our house right now. After 3 solid months in underwear, we put our toddler back in diapers.

We have three beautiful children, ages 12, 2 and 9 months. The two year old, Wyatt,  is almost three, which is why we started potty training him back in December, 2012. We thought we were doing everything right but boy were we wrong.Wyatt seemed ready, he was exhibiting all the signs we were told to watch for. He seemed interested in the toilet, he didn't like being in a soiled diaper, and he was waking up dry after naps and even overnight.

Wyatt

Method number 1, leave your child to run around naked from the waist down. We did this. Dutifully, for three whole days Wyatt went pantless on my couch with the potty in one corner of the living room. The microwave timer set to go off every twenty minutes so that we could bribe/request/force his tushy on that potty. Failure.

Method number 2, by now the books all said to go ahead and put pants on, that your child should be toilet trained. Ha. We had trained ourselves to put Wyatt on the toilet at regular (though longer than 20 minute) intervals. We got pretty good at this over the next few months but if we forgot, or Wyatt drank more than usual, and every time he went number 2, it was Failure.

Method number 3, don't put him on the toilet in the hopes that he will start "initiating" this process. By this time a power struggle had set in and every bathroom trip had become a meltdown, throwdown battle. Maybe, we thought, he will just go on his own if we stop bugging him so much? Failure.

So here we are, back in diapers. I was not happy about it but Wyatt was. He's been the happiest I've seen him in three months. I didn't realize how stressful potty training could be, the problems of a two year old, eh?

Selfie
Do you have any advice on how to start fresh next time we try to tackle this issue? How did potty training go at your house?

Lindsay